The Bee Wall at Maryland University Arboretum Outreach Center
It has been two weeks of hard work and a little bit of frustration but our bee wall habitat is done. Our goal was to build a meandering wall on Maryland University Campus suitable for earth nesting solitary bees and other critters, and a protected bee box with openable viewing panels and a microphone for listening to bees attracted to our bee box.
The wall has layers of materials with red, brown and even a black layer containing top soil. The contrasting colors are to simulate the cut that a tiny stream might make in passing through a meadow.
Section 1: Tools of the trade
There are many tools used in cobbing in general I show and discuss mostly the tools used for urbanite and tiller cobbing.
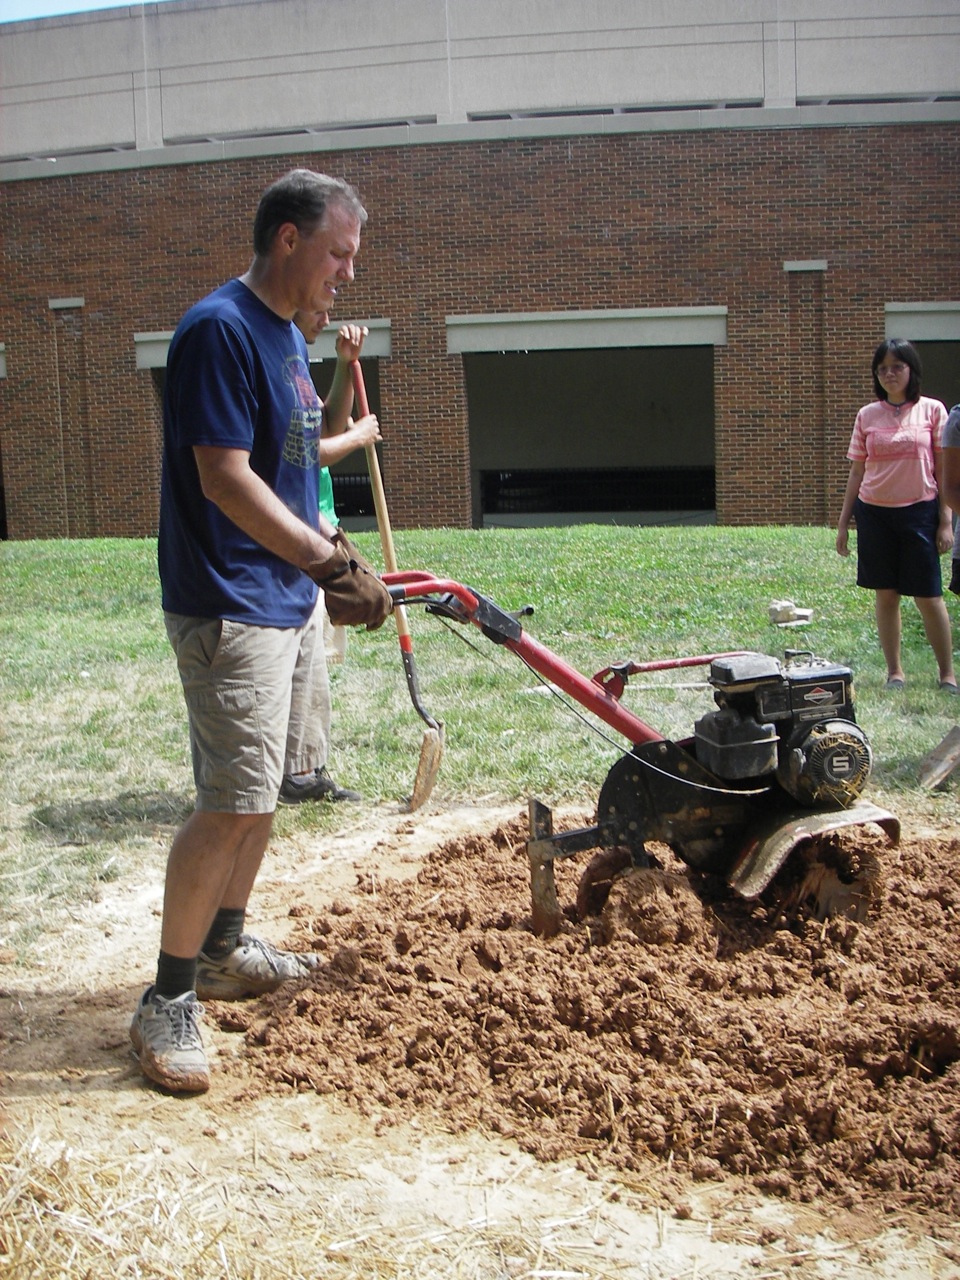
Figs. 1 and 2 show a small front-tine tiller with a 5 Hp Briggs and Stratton engine. I have tried rear tine tillers with power driven wheels, but they don’t work. Often you need to run the tiller up on to a pile of cob and then pull the tiller backwards against the forward motion of the tines. Also you will need to get the tiller to hover in a single spot either to dig deeper when pit mixing or to simply stir the cob into mush or break up chunks of clay. You can’t do that with power driven wheels.
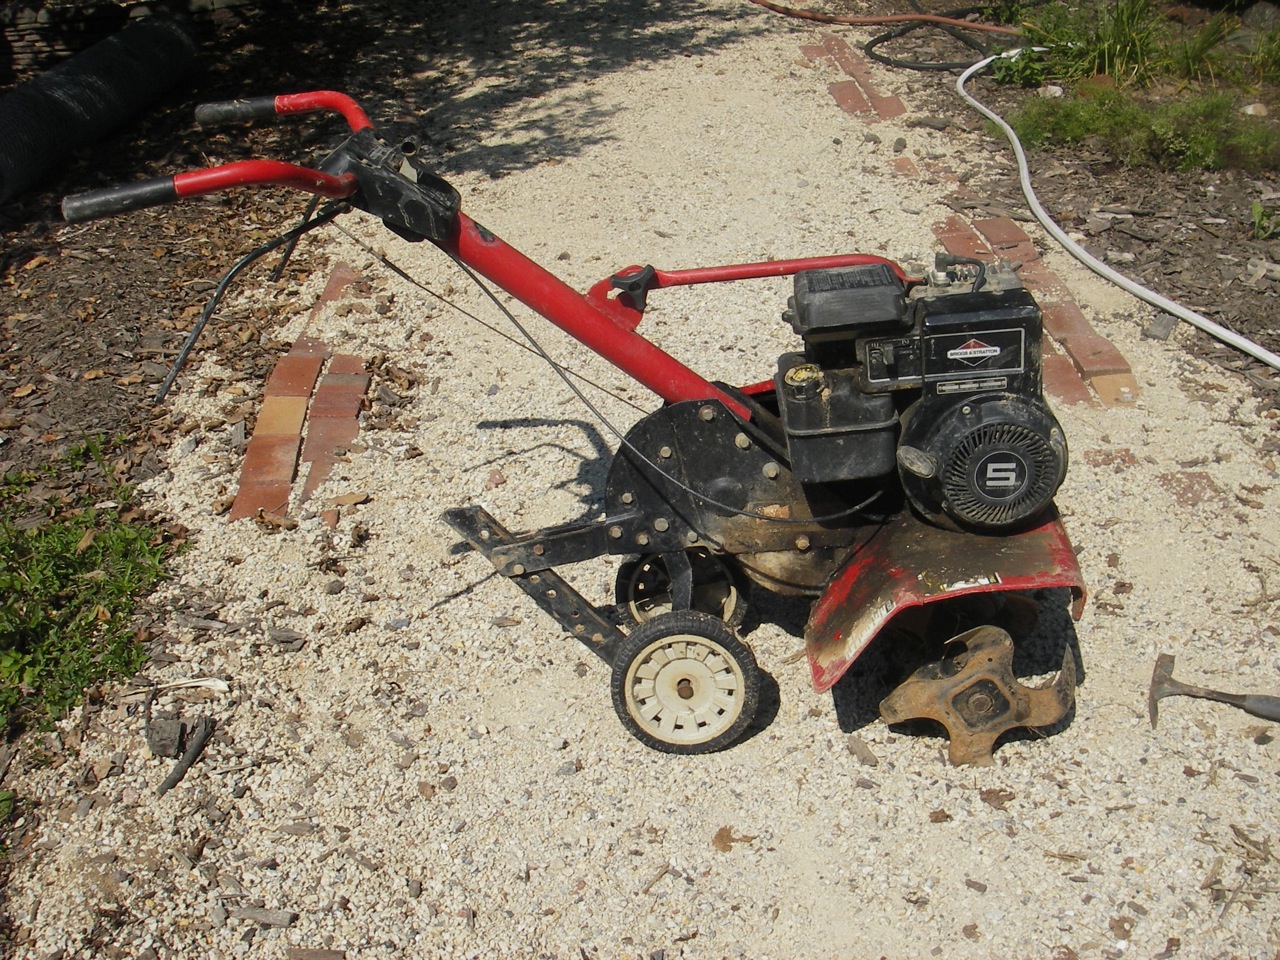
I use a mason’s hammer to clean chunks of clay and straw off of the tines. Also, I should note that this is a very old tiller, and working on cement or asphalt pavement sharpens the tines to a razor point. Before I stick my hands in between the tines to remove clumps of clay and straw I give each tine a sharp rap with the blunt end of the hammer to blunt the tines and avoid inadvertently cutting my hands or arms.
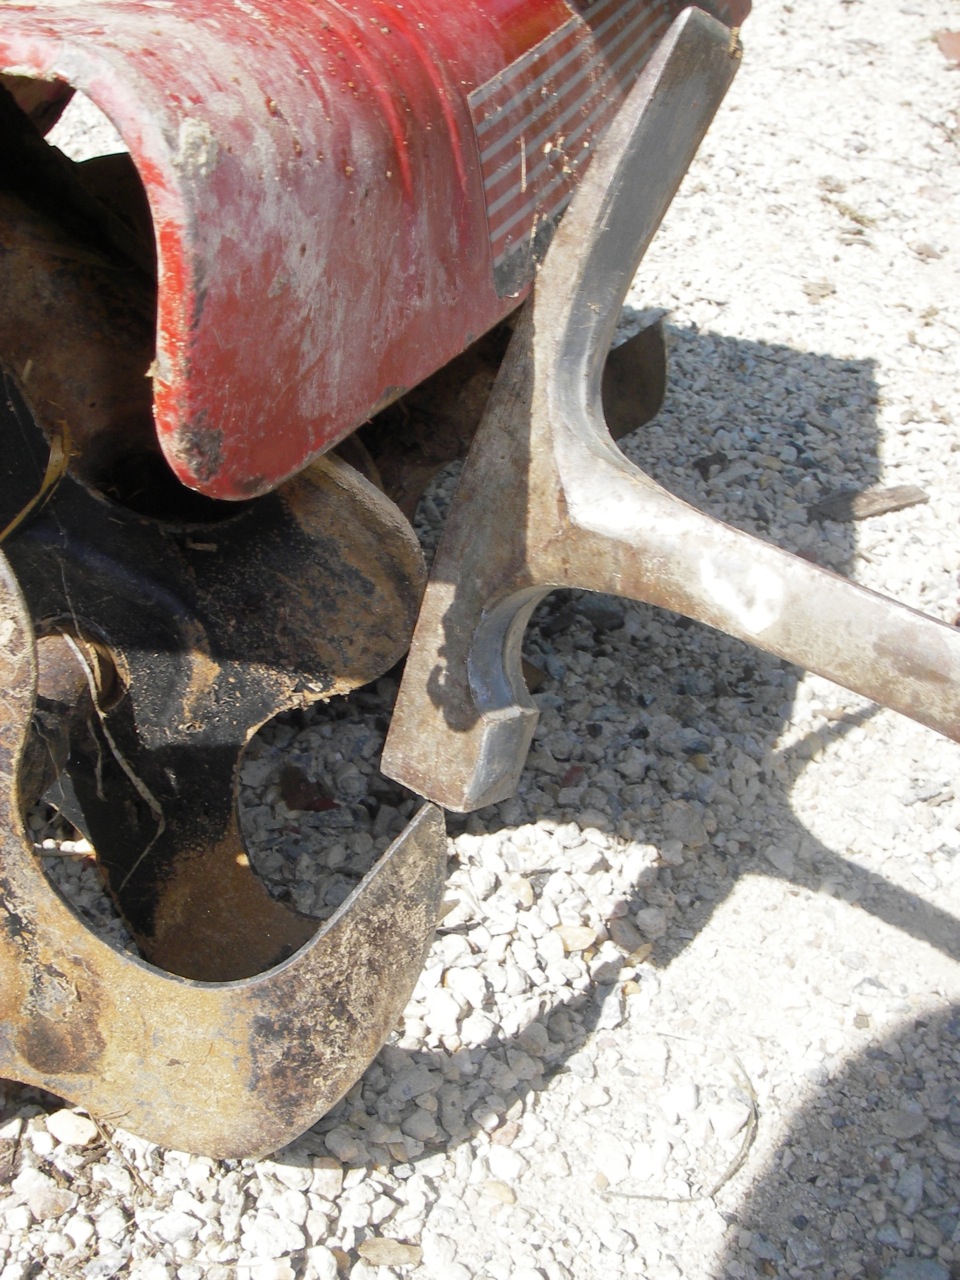
Fig. 3 shows from left to right an ice chipper used to chop off splooging. This is a particular problem with tiller mixing in that the mixes are often wetter than with foot mixing and keeping the material trimmed back is a constant problem. Next to that is a 15-pound Ugly stick This can be made lighter or heavier. The handle is chainsawed for the height of the user. It has knots and other grain irregularities to prevent splitting and it is especially useful when pounding in fragile pieces of stone because the soft head surface does not break the stone and throw off chips as much as the store bought tamper does.
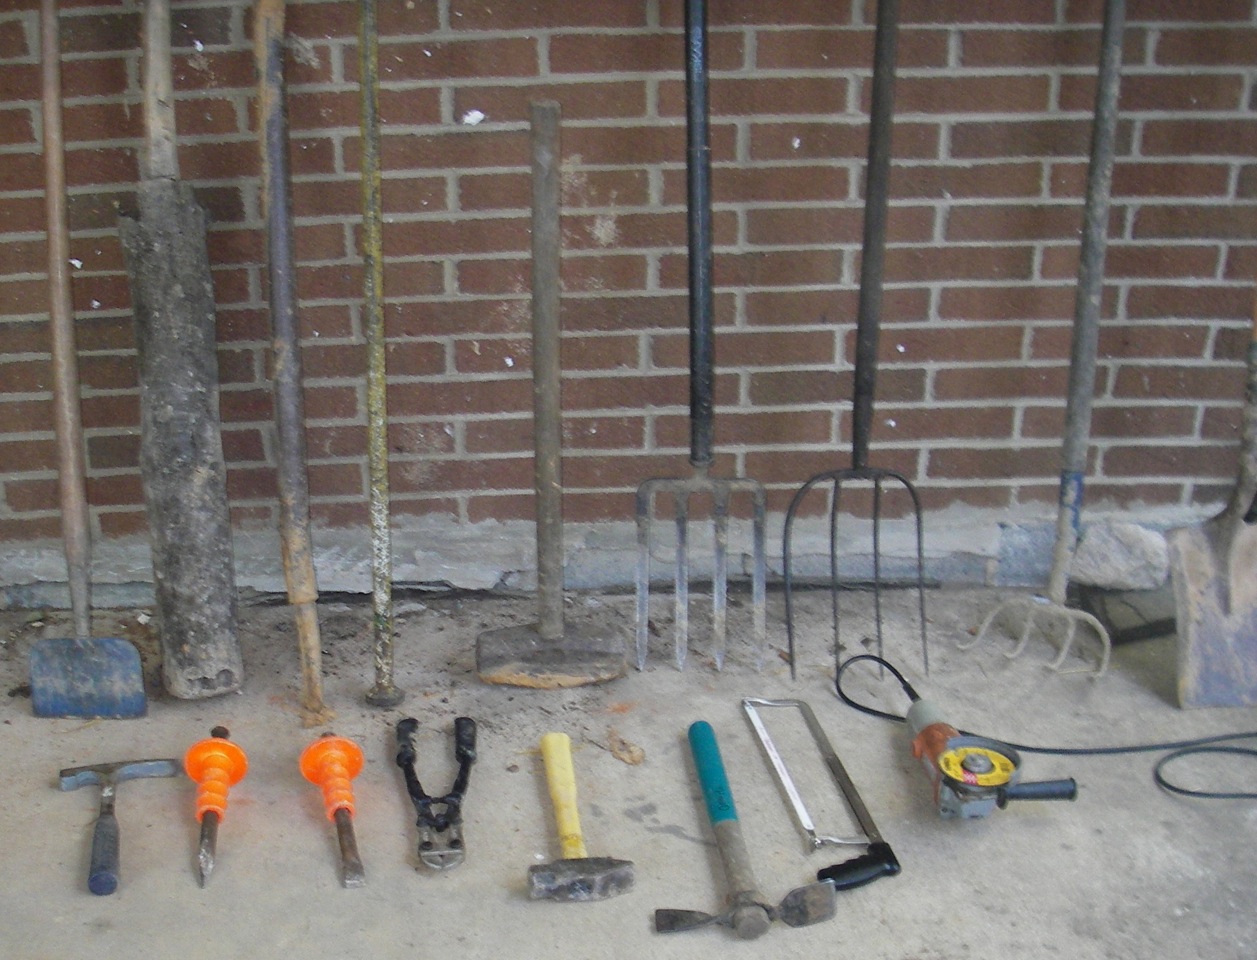
Next in line there is a homemade pry bar and a store-bought pry bar and tamper. (If there is anyone reading this who would like to create a cottage industry the homemade pry bar is made by welding the tip of an air hammer to a hollow pipe.) The homemade pry bar is lighter and more rigid than the store bought pry bar, and when you need to pry out rocks or pieces of urbanite from a pile it is much easier to work with.
Next in line is a 28-pound hammer for breaking pieces of urbanite. In many ways, unreinforced pieces of sidewalk are an ideal building material because they have no grain. This means that if I want to break a piece of urbanite at or about a certain point or line, I can score it with the flat bladed chisel or a diamond saw, turn the scored side down and then hit it with either the 28-pound or the 3-pound hammer, whichever is appropriate.
After the 28-pound hammer there is a dirt fork, a pitch fork, a pull fork and a flat bladed shovel. The dirt fork and pitch fork are very useful for picking up cob off of a paved surface and loading it into a wheelbarrow. I worry about using the pitch fork because the tines are so sharp.
The pull fork has tines bent at a 90⁰ angle to the handle. it was not used when mixing cob on a concrete or asphalt slab but it is very useful when pit mixing.
The flat bladed shovel is good for shoveling dry sand spots into wet spots when slab mixing. It is also good for lifting finished cob up off a slab, but it is useless when doing pit mixing.
In the front row there is a mason’s hammer, point chisel, 1” chisel, wire cutters, 3-pound hammer, Ground Hog, hacksaw and grinder.
The wire cutters, hacksaw and grinder with composite blade are all useful in dealing with the pig wire and rebar in urbanite. We had lots of that in this project. The Ground Hog with the blue handle is used for trimming off splooge and for carving.
The mason’s hammer, chisels, 3-pound hammer and grinder with a diamond blade are used to shape the urbanite. Note that when using these tools you should always wear eye-protecting glasses. Diamond blades come in wet and dry types. The dry blade has notches in it. I always use the wet blade and have someone pore a slow stream of water on my work as I am cutting. Important! I also wear a dust mask.
Section 2: Construction
Construction started by spray painting the grass to show the wall footprint and scraping off the sod. We originally planned a wall that was to be 24 feet long, around 2 feet wide, and 4 to 8 feet high, with a cob roof. That turned out to be too ambitious by half considering the working conditions and the difficulty we had obtaining materials when we needed them. We also planned to have a foundation, but the soil there was so hard and compact that a foundation was not needed even at the projected 8 foot height.
Our second step was obtaining urbanite. There are several places on the campus where construction crews had torn up piles of rubble. Unfortunately all of it was reinforced with "pig wire," a heavy wire mesh with 4" x 4" openings. Most of the urbanite was between 4" and 6" thick, and I want to especially thank the two young men and one woman who helped me pick through the rubble to find and separate out pieces that were suitable. We ended up recycling an estimated 7,000 pounds of old concrete.
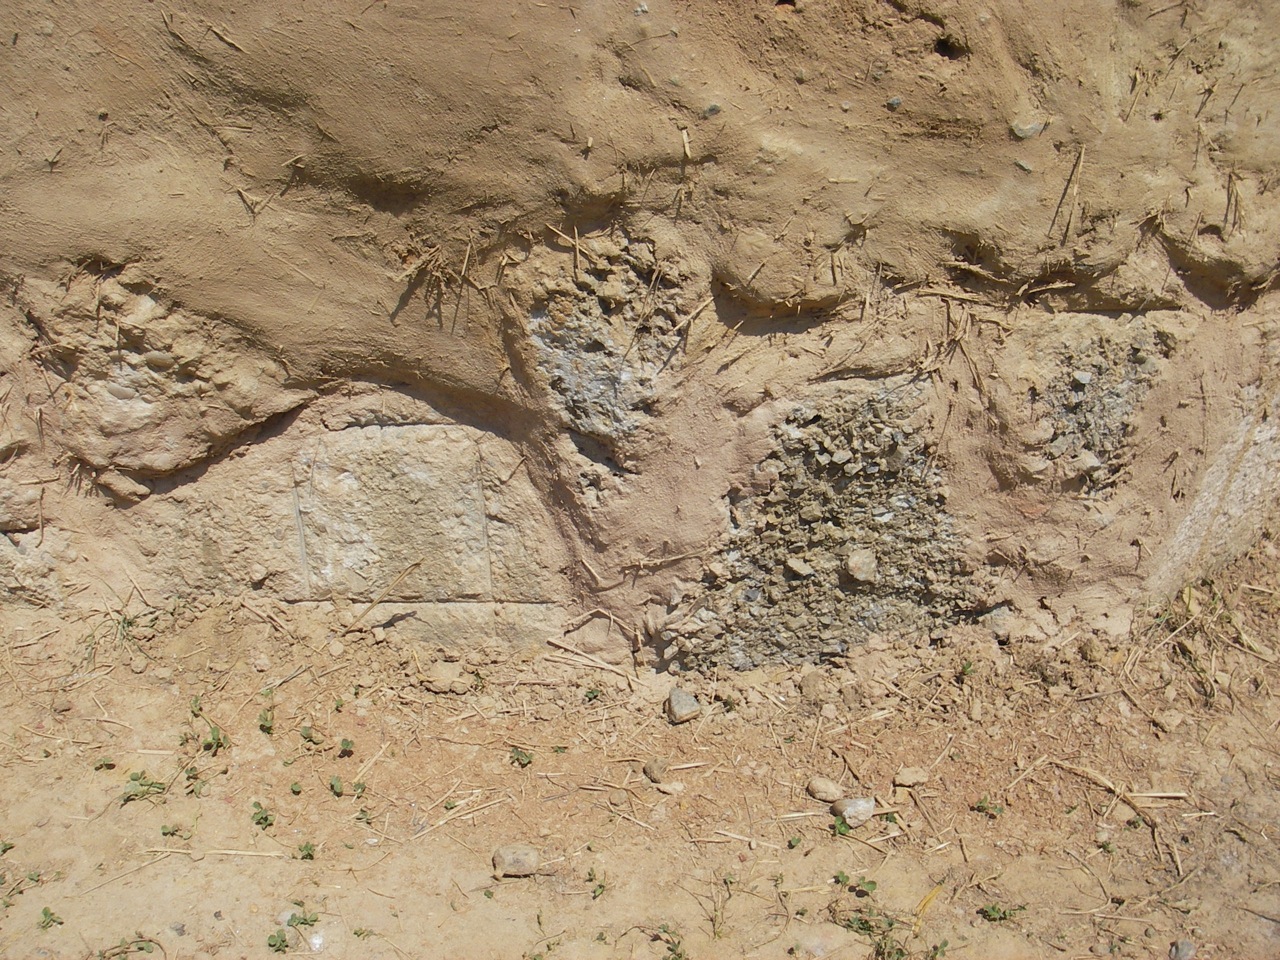
Fig. 4 shows our urbanite after one day of work.
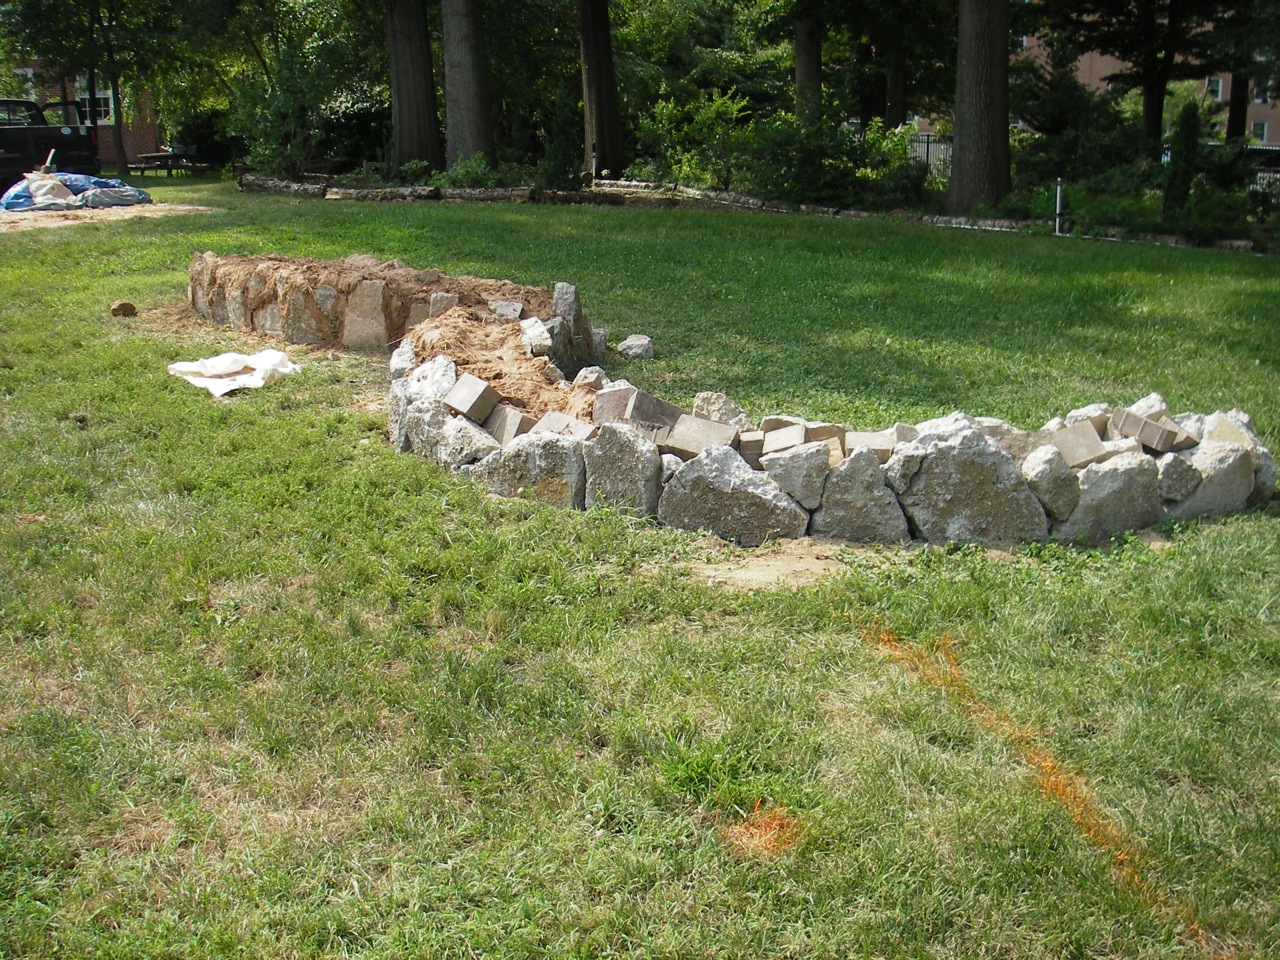
The concrete of the urbanite had been poured onto a bluestone base, giving us a finished side and a gravely side. After some discussion we decided to place the gravely side facing out. The center of the wall is also urbanite standing on edge, with small chunks bridging spaces between larger chunks to produce a base that is honeycombed with passageways for drainage, and for snakes, toads, crickets and other things that like to live in such places. We also placed a section of drainage pipe in there but just ran it into a shallow French drain.
Fig. 5 shows urbanite after three days of work
Picking and placing the concrete took three full hard days and many cut fingers since the pig wire had to be cut or broken off where it stuck out on the outer face. We cobbed it in place on the interior. We used a sandy mix to speed drying and reduce shrinking. It was slow going.
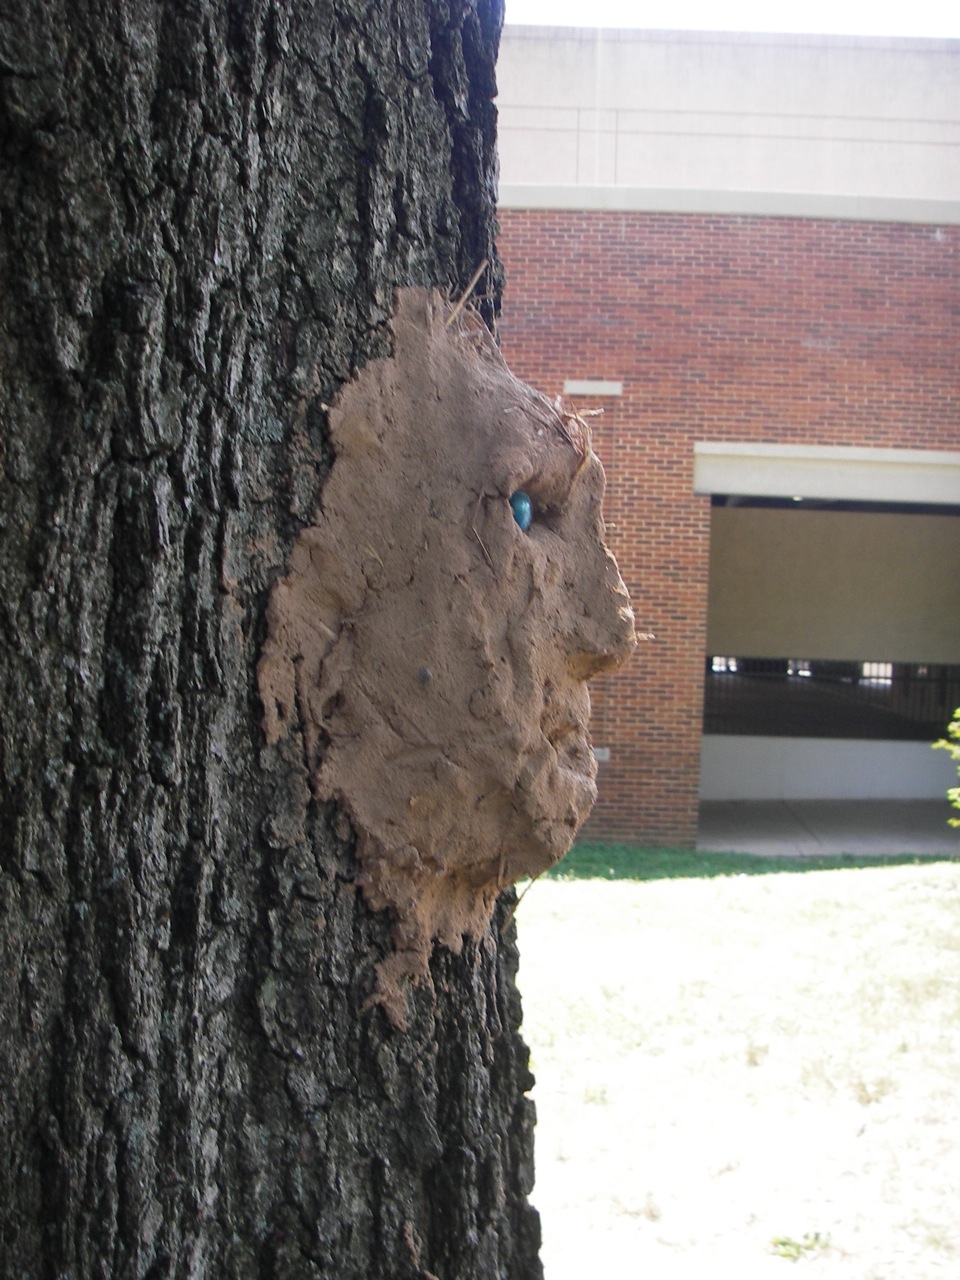
People ask me what is a “sandy mix” They usually want a recipe like one part clay and two parts sand. I can’t give them a recipe because every part of the earth differs from every other part of the earth. In one place 2 to 1 will give you a sandy mix; in another place it will give you useless material that will not hold together. The only thing I can say is that you need to develop a feeling for the material. I will say one thing, though: if you can take a blob of your material and stick it up on a tree and sculpt a face into it as in Fig. 6, that is a not a sandy mix, that is a clay rich mix.
Our ideal piece of urbanite had to weigh 25 to 75 pounds, small enough to lift and put in place but big enough to stay where we put it. Preferably we looked for a flat lower surface, but nearly perfect pieces were reshaped with a 26-pound breaking hammer, a 4-pound sledge hammer and a wide range of chisels or, as a last resort, a diamond saw.
We also made good use of an ugly stick. An ugly stick is just that, an ugly-looking 15-pound wooden club with a handle on it. If you try to make one out of a beautiful straight-grained piece of wood it will quickly split and become useless. If on the other hand you select a piece of wood with knots and lots of irregularities in the grain of the wood it should last for many jobs. We used the ugly stick for tamping down the soil in the footprint of our structure. Also, we used it to tamp down and level the various pieces of urbanite so that slight irregularities in the bottom of the urbanite would be closely meshed with the underlying soil and stand perpendicular as we built around them. Note that the weight and the soft end of the ugly stick will do a lot of compacting without breaking the rock and sending out shards of stone. The person holding the stone in place when it is being pounded should wear safety glasses anyway. Usually the piece of urbanite being pounded in place is held vertical with a stick or some other tool that does not endanger the holder’s fingers.
When some of our pieces of urbanite started to tilt out because of splooging pressure on the inner surface, we used the ugly stick to pound them back into vertical. We also used it to break up lumps of dry hard-packed clay in order to make a special plaster used for cob mixtures. At some points in the wall you can see streaks of bright red clay. This color came from lumps of red clay that we separated out from ordinary reddish brown clay and shattered on the pavement with the ugly stick. We hydrated the lumps in a bucket of water using a half inch drill and a drywall mud mixer paddle.
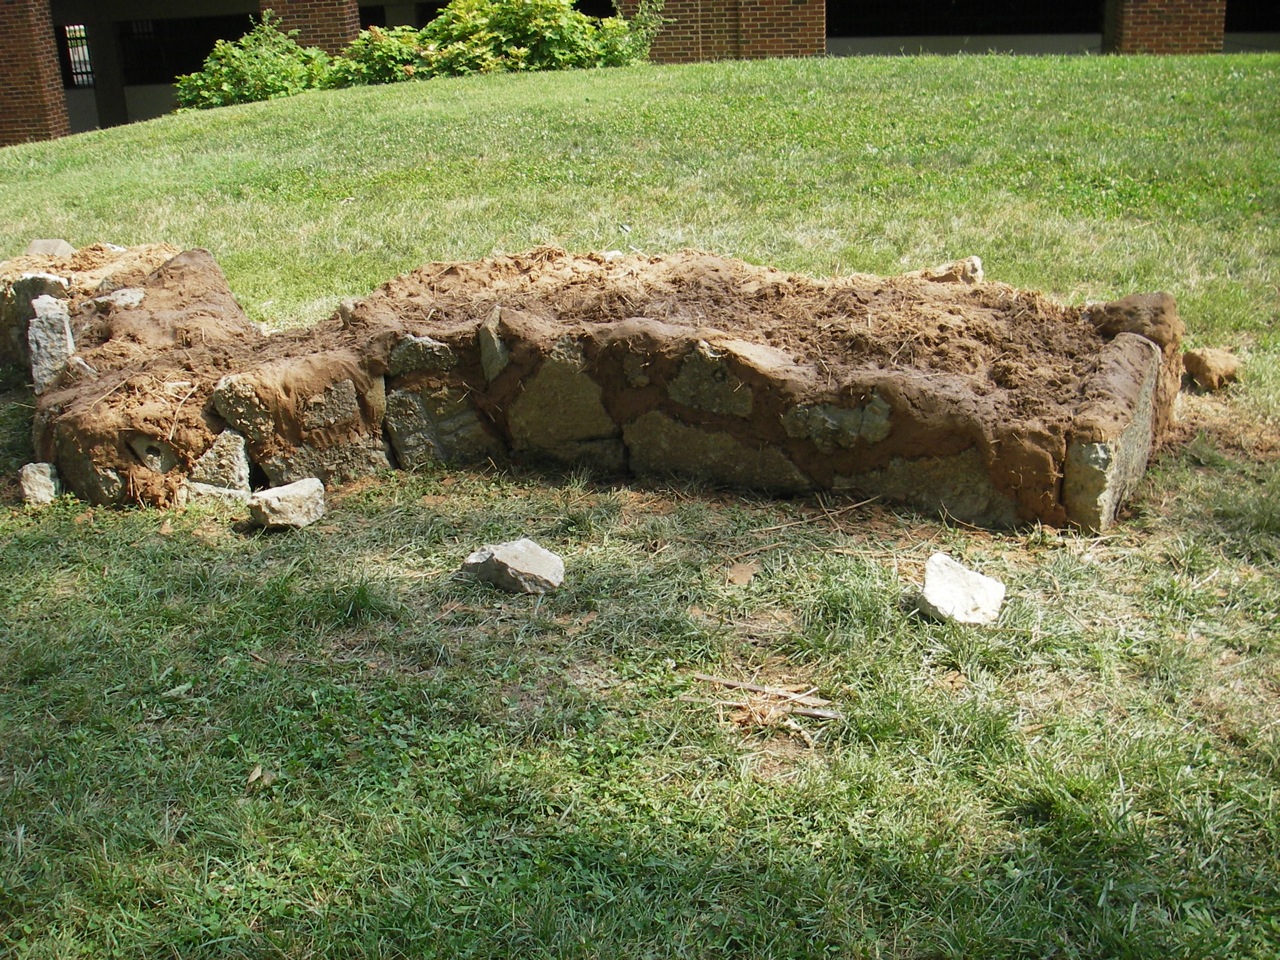
The foundation wall is often referred to as a knee wall because in many English dwellings it is about knee high. My goal here was to provide a 6" to 12” air space within the wall, between the bottom of my cob material and the earth surface. Water from heavy rains should be able to flow around and below the urbanite and into our drainage pipe and French drain without touching the cob. In places where foundation pieces did not provide at least 6” of clearance we placed additional pieces of urbanite on top of those contacting the earth.
Fig. 7 shows two layers of urbanite
These second-layer, additional pieces of urbanite look like they are cobbed in place but in fact they are supported in place by small stone wedges. Then sandy cob was forced into the cracks between upper and lower foundation elements to look like they are mortared in place. The faux mortar holding them in place is actually on the back side and top of the urbanite pieces.
The faux mortar was made by rototiller mixing small 4-wheelbarrow batches of mud and sand material on an asphalt road surface to make a very sandy batch with little straw. This was forced into cracks and crevices. The high sand content minimized shrinking and gave us fast drying times. When the entire first layer was finished we left our work for a weekend of undisturbed drying.
Finally we were at the point to begin our full sized cobbing runs. We had one clay supplier with reddish brown clay that was available for the remaining 7 days of cobbing, but sometimes, when there was a concrete pour going on, we were denied access to the site and had to go elsewhere for clay. Other times we had to wait for a backhoe or front end loader to become available to load us up.
At another construction site there was a dark bluish brown clay. That supply was only available for two days. This is normal. Usually, as in this case, the site manager had to remove a quantity of material, so he rented trucks and a backhoe for two days and then he was done.
Finally, the garden manager at the university gave us a batch of nearly black clay with lots of topsoil in it. This process of getting clay from multiple sites and the lack of storage space forced us to stop work many times while pickup trucks roamed the Maryland University campus looking for someone to provide us with dirt. Also, we did not have the space to stockpile materials because we had only a small bit of paved surface available to us, and in this space we had to park our cars, store sod and gravely dirt removed from our wall footprint, store our sand, tools and other materials, and do our mixing. This gave us only enough space to tiller mix one batch of clay, sand and straw at a time, and no space to stockpile the differently colored clays as they would have blocked our parking spaces. As a result of this our structure became less than half of what we originally planned, but we still mixed and moved around 20,000 pounds of cob with a crew that varied from 4 to 6 working adults and a few one-day volunteers and children.
The Mix
My experience indicates that digger bees, particularly Anthophora plumipes and Anthophora abrupta, our target species, prefer a mixture of mason’s sand or mortar sand and rock-free clay. I know for certain that they do not like rock dust. I have several cob structures on my property and no bee has ever successfully nested in cob made with rock dust, probably because of the large numbers of small pebbles in the mix. Concrete sand is just a little coarser than mason’s sand, and I have no idea if it is acceptable for bee habitat. I think it is, but have never used it.
We started with small sandy batches, and tried to keep the mix fairly dry to limit splooging and to prevent large amounts of shrinkage. These small batches were well mixed and moved to wheelbarrows using dirt forks and flat-bladed sand shovels, which can be slid along the paved surface to lift the heavy blobs of clay. Often we found that the mix in the wheelbarrow was too dry so we had bottles of water available all along the wall so that we could add water as needed to form cobs. Often the cobs were granular and would not hold together. We were able to improve their physical properties by wetting the mix, and slamming blobs of mix on the sides of the wheelbarrow and then punching out air spaces with the side of our fists.
Later, when we began using more clay, the batches got stickier and we began forming giant cob pancakes again by slamming clay on the wheelbarrow sides to improve their feel and pound out air pockets.
The largest clay-rich batches consisted of 4 wheelbarrows of sand and 4 to 5 wheelbarrows of clay. These batches, when mixed with water and straw, were about 2,000 pounds each. The blades of the rototiller only reach down 3” to 4” inches, so we tried to work thin layers by piling up the mix and then pulling down the deep spots by dragging the tiller backwards against the forward movement of the tiller blades. Assistants with sand shovels tossed dry material onto wet spots, and the tiller operator would again run the tiller up onto the toss area and again drag the clay out by pulling the tiller backwards against the movement of the tiller blades.
Fig. 8 shows running the tiller up on to a deep spot.
Fix 6A shows running the tiller in circles to incorporate straw.

We mixed only sand and clay at first, adding water till we had a mix that was just a little wet and sloppy.
We then added straw and ran the tiller around in a circular pattern just enough to mix in the straw and to dry the the cob for the perfect mix. This gave us a huge leeway to adjust the moisture just by adjusting additional amounts of straw.
One big surprise is that we did not need to use chopped straw. I have always assumed that long straw would wind itself up on the tines of the tiller, and I came prepared with a mason’s hammer thinking I would need to cut and chop straw and mud off the rotors of our tiller, but it turned out that after 7 days of cob mixing the tiller was not clogged enough to need cleaning.
Fig. 9 Our cobblestone finish
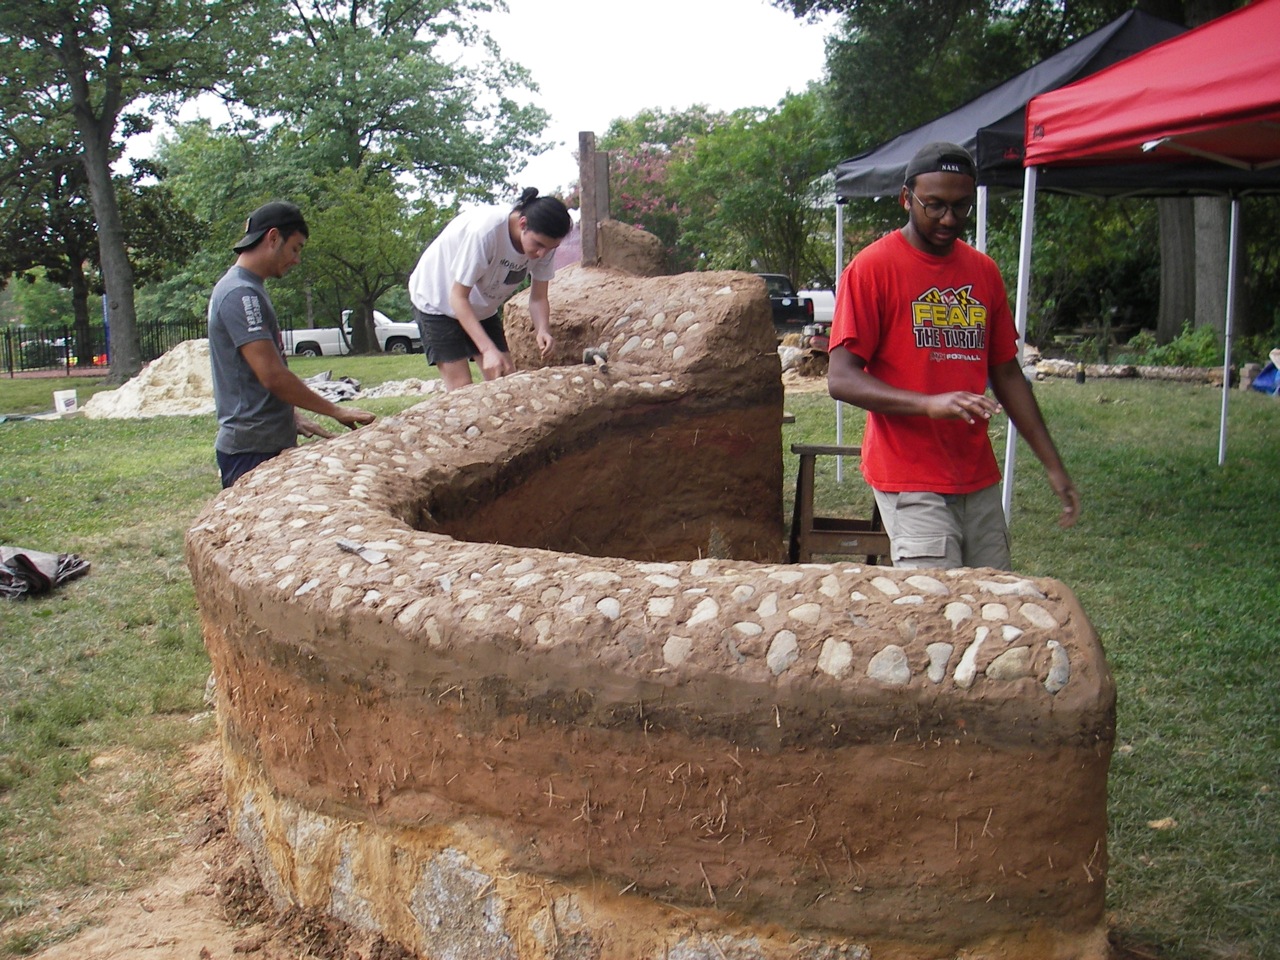
We are using a cobblestone finish in areas of the wall not protected by our roof structure. This was formed by applying a thick layer of cob, letting it dry for a few hours, and then pounding river rocks into the surface. The theory behind the cobblestone surface is that when it rains water readily soaks in and saturates the surface of the cob between the rocks and then begins to run off. The rocks however provide a choke point. Water passes deeper into the wall slowly and when moisture passes the choke point formed by the cobblestones it is wicked quickly into the larger mass of cob without ever saturating more than an inch into the surface.
We figured out very quickly that we would not be able to reach our planned 8 foot height topped with cobblestone, and so early on we attached deadman anchors to two cedar posts and embedded them in the wall. A deadman is simply a horizontal piece of wood fastened by screws or nails to the vertical to provide additional support. These posts serve as supports for our roof and the bee box.
Fig. 10 The vertical posts and Bee Box
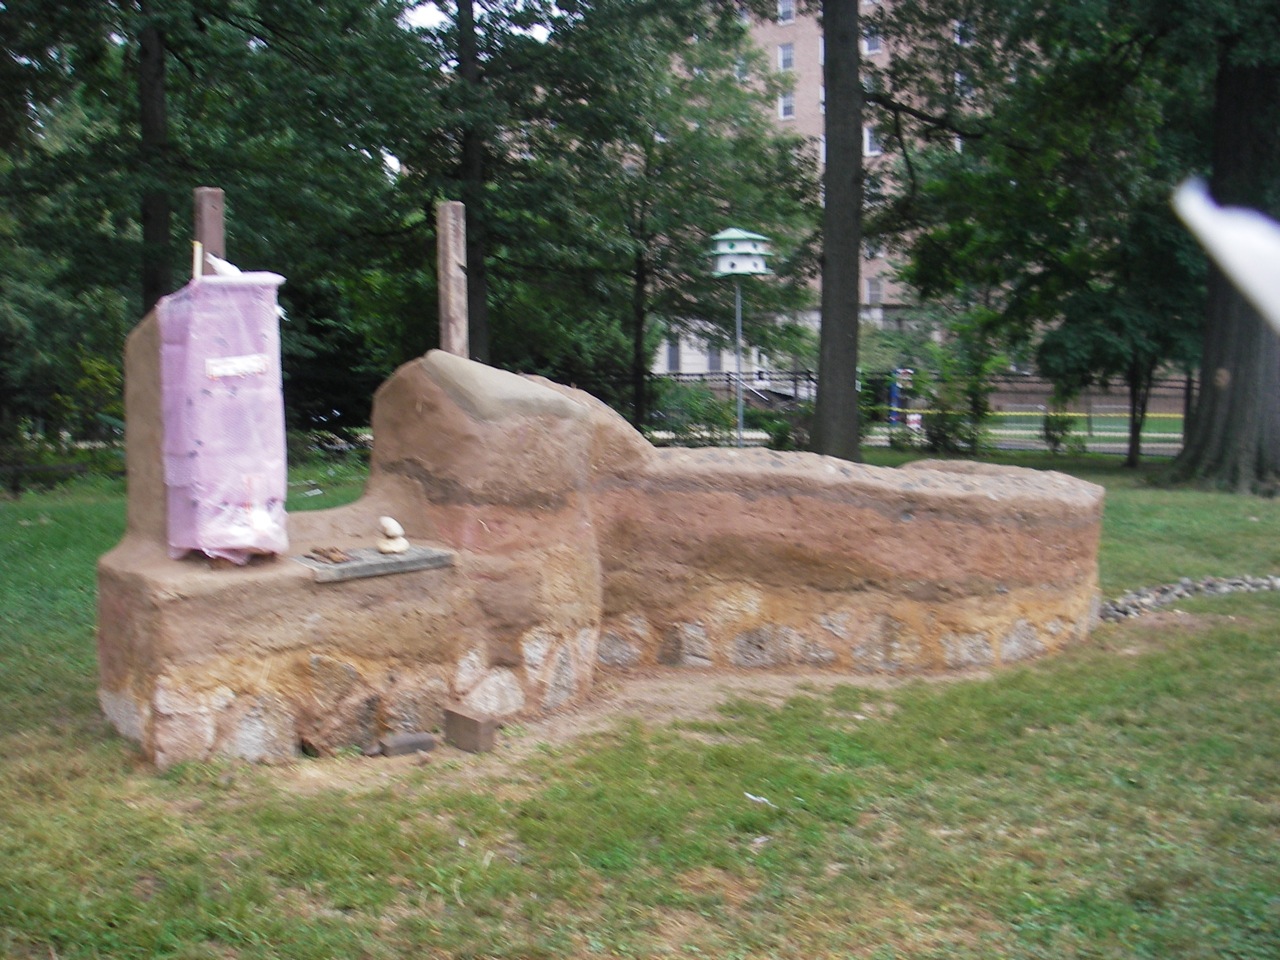
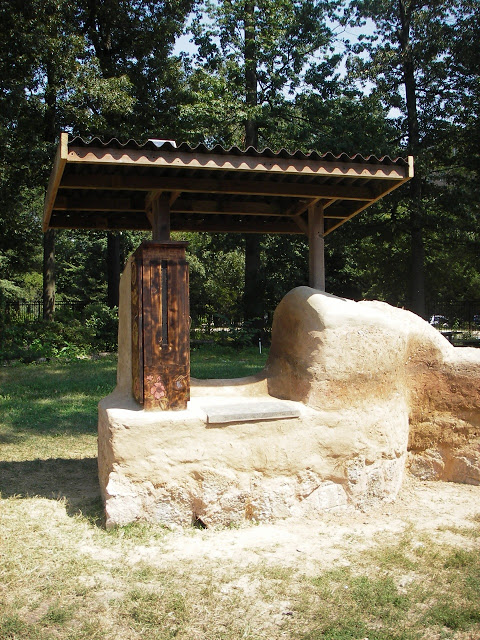
Our Bee Box was embedded in a cob column adjacent one of our deadman roof support columns. After only 5 days of building and a weekend of drying time the deadman posts seemed strong enough to support a small corrugated roof.
Fig. 11 finished view of Bee Box and stone seat.
Fig. 12 Side view of Bee Box
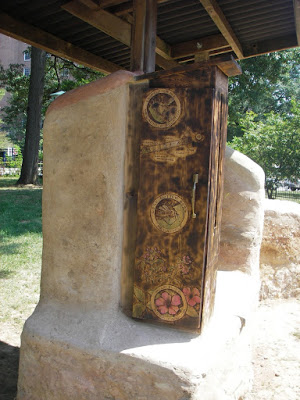
Fig. 13 Bee box with opened door showing audio amplifier and passageways for several species of solitary bee. Note differently sized passageways for large and small species of bees.
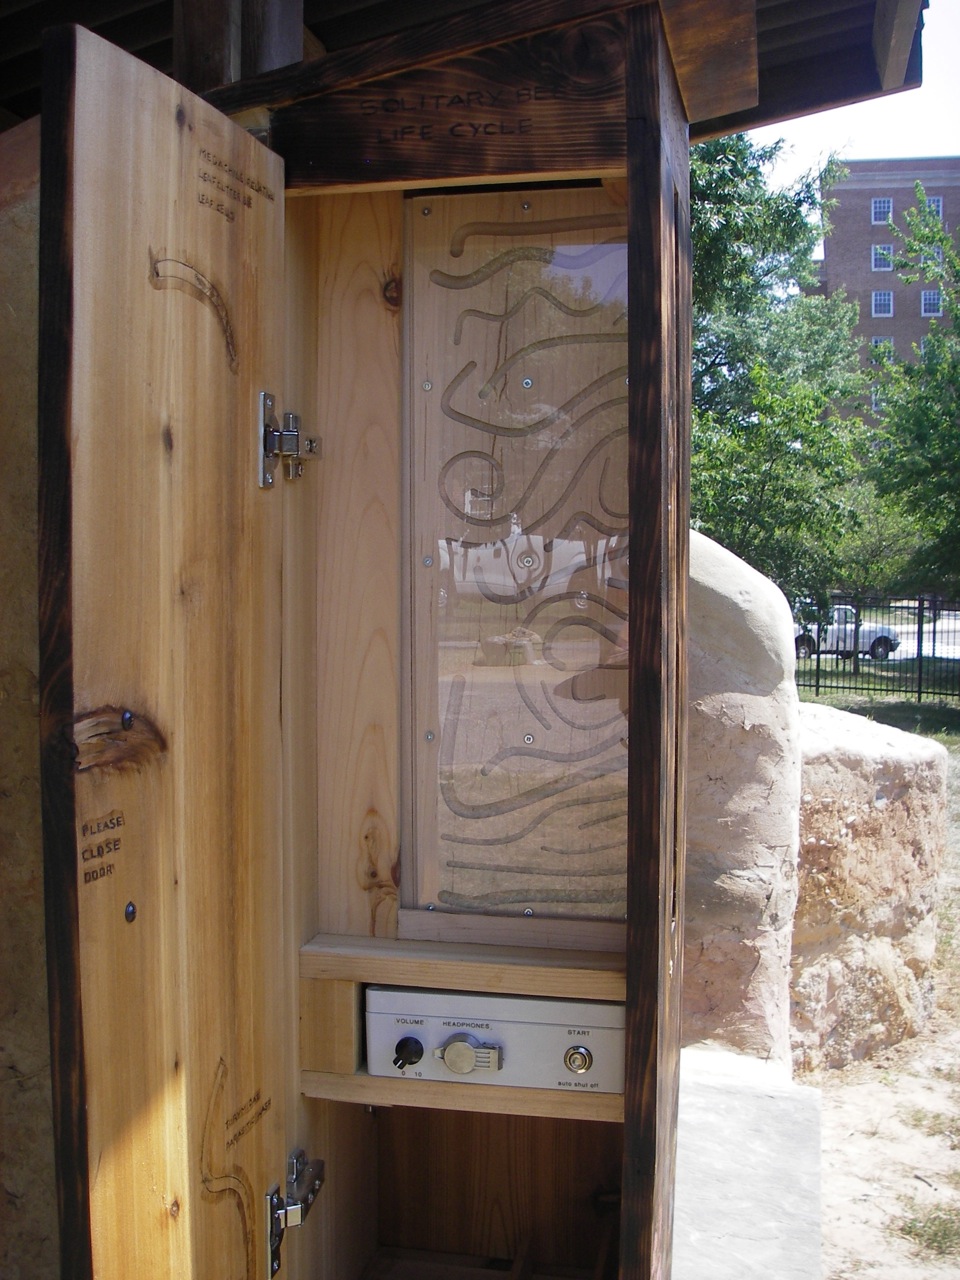
Fig. 14. Back view. Note relatively undisturbed grass.
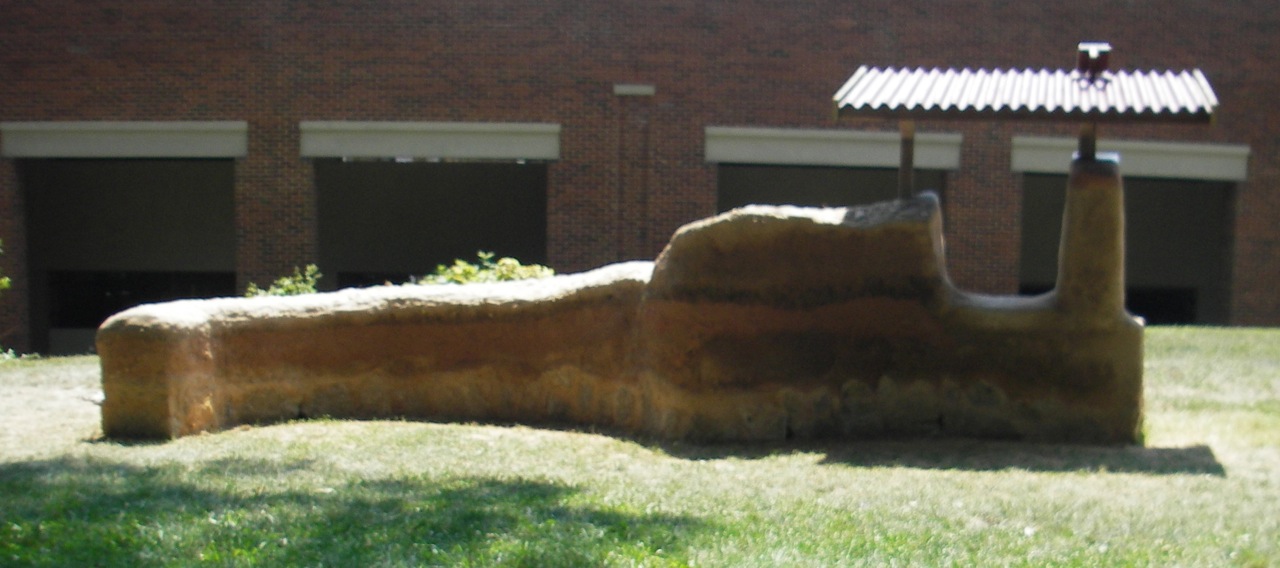
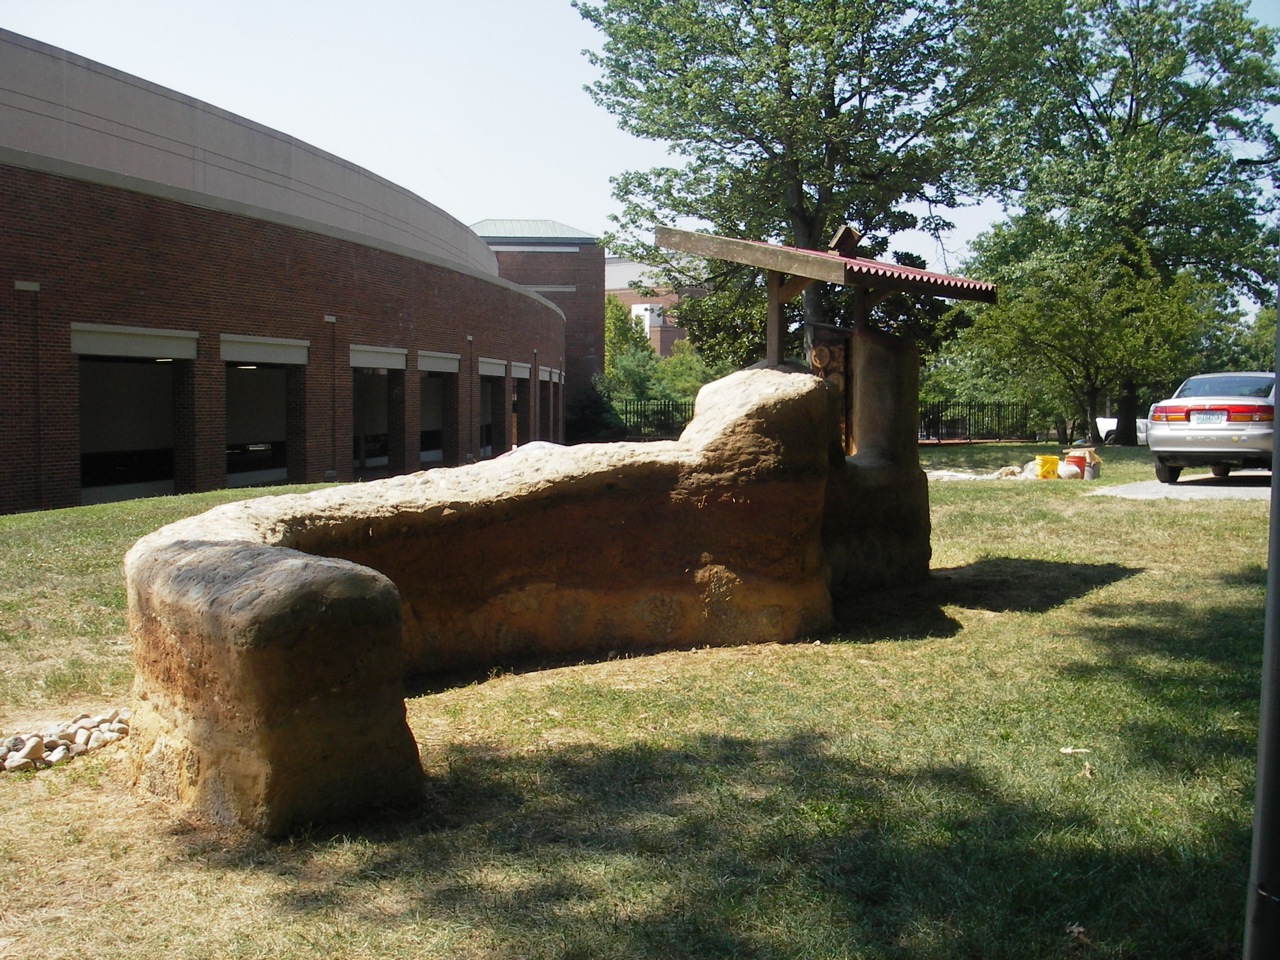
Fig. 15 End view with nearly empty stadium drive parking lot in the background.
Footnote: Mistakes made and things learned: This is the first time I have ever built a structure with non-cobbers. Normally before beginning a structure we make a model of the structure from clay.
To this end I invited Lisa to my house and I made a model and I had Lisa make a model on a wooden board. I then destroyed the models, put the modeling clay in a bucket, and put the bucket and the boards in Lisa’s car and asked her and Sarah to make a model and bring it on the first day.
On the first day I asked to see the model. They didn’t have it. I asked her to bring in the modeling clay. They threw it out in the yard. I made up another batch of modeling clay, handed it to them and asked them to make a model. They went in and put flower pots and a piece of cardboard together on a table and said “There’s the model”. I was totally disgusted and walked out. We did not discuss a model after that.
There are several reasons to build a model. The first is that the original design was difficult or impossible to construct and I think Lisa and Sarah would see this if they built a scale model. The second is that we could use the model in a builder's circle to discuss and improve the design. For example, we could place the model on the building site and ask, “Where is the sun?” Where does the prevailing wind and rain come from and how do these factors affect our design?"
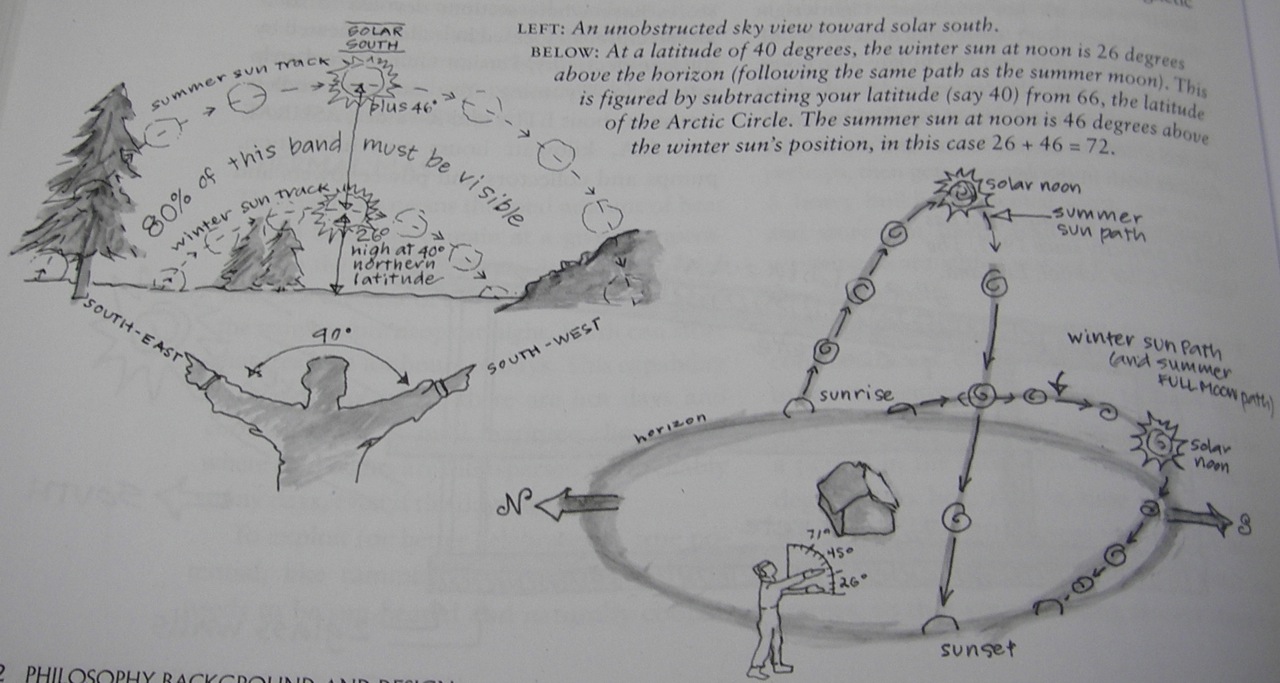
Fig. 16 Page 82 of The Hand Sculpted House showing the sky view exercise used in discussing the building design.
We did not do this and ten days later after, we cobbed in the bee box and determined the shape and slope of the roof Sarah informed us that the bee box “...had to be shaded.” Unfortunately, with the bee box facing the south and the shed roof sloping up to match the slope of the bee box roof, there is no way to shade the box with out tearing apart the the wall and reorienting the box.
I suppose that the builder’s circle is meaningless to people who have no interest in learning how to design and build cob structures. It was my responsibility to discuss this and I failed. In the future I will look for a better way to communicate with non-cobbers.
--Ed